---
title: Create & Edit an Area on a Map Layer
description: Learn how to create and edit an Area on a map layer, using the measuring and snapping tools to keep your drawing tidy and accurate.
---
[Skip to content](https://support.resolutionapp.co.nz/map-layers/create-and-edit-an-area#main-content)
English - New Zealand
Show submenu for translations
[](https://www.resolutionapp.co.nz/)
- [Home](https://www.resolutionapp.co.nz/)
- [About us](https://www.resolutionapp.co.nz/about-us)
- [Testimonials](https://www.resolutionapp.co.nz/testimonials)
- [Pricing](https://www.resolutionapp.co.nz/demo-and-pricing-request)
- [Events](https://www.resolutionapp.co.nz/events)
- [Help Centre](https://support.resolutionapp.co.nz/)
- [Contact Support](https://www.resolutionapp.co.nz/support)
- [Request a demo](https://www.resolutionapp.co.nz/pricing#request-demo)
Open main navigation
Close main navigation
- [Home](https://www.resolutionapp.co.nz/)
- [About us](https://www.resolutionapp.co.nz/about-us)
- [Testimonials](https://www.resolutionapp.co.nz/testimonials)
- [Pricing](https://www.resolutionapp.co.nz/demo-and-pricing-request)
- [Events](https://www.resolutionapp.co.nz/events)
- [Help Centre](https://support.resolutionapp.co.nz/)
- [Contact Support](https://www.resolutionapp.co.nz/support)
- [Request a demo](https://www.resolutionapp.co.nz/pricing#request-demo)
- English - New Zealand
Show submenu for translations
- [Login](https://app.resolutionapp.co.nz/)
[Login](https://app.resolutionapp.co.nz/)
How can we help you?
- There are no suggestions because the search field is empty.
1. [Resolution Help Centre](https://support.resolutionapp.co.nz/?hsLang=en-nz)
2. [Map Layers](https://support.resolutionapp.co.nz/map-layers?hsLang=en-nz)
# Create & Edit an Area on a Map Layer
## Learn how to create and edit an Area on a map layer, using the measuring and snapping tools to keep your drawing tidy and accurate.
The Area tool is one of four mapping tools available. The other three - line, point and my location - are covered in separate articles.
### On Mobile and Desktop
- Map Layers can be used on both Mobile and Desktop. Everything in this article works the same way on both.
- You can use map layers when creating both Records and Tasks.
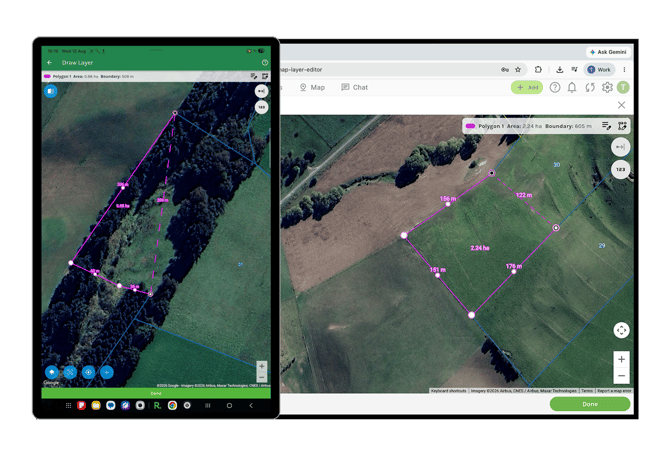
mobile and desktop.
### Creating a Layer
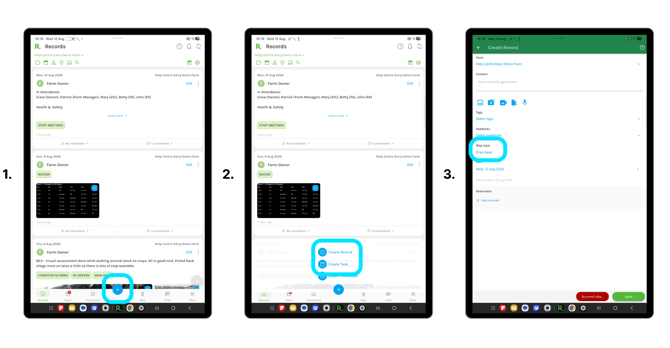
1. Select the blue plus icon, then select Create Record or Create Task.
2. Under Map layer, select Draw layer.
### Choosing the Area Tool
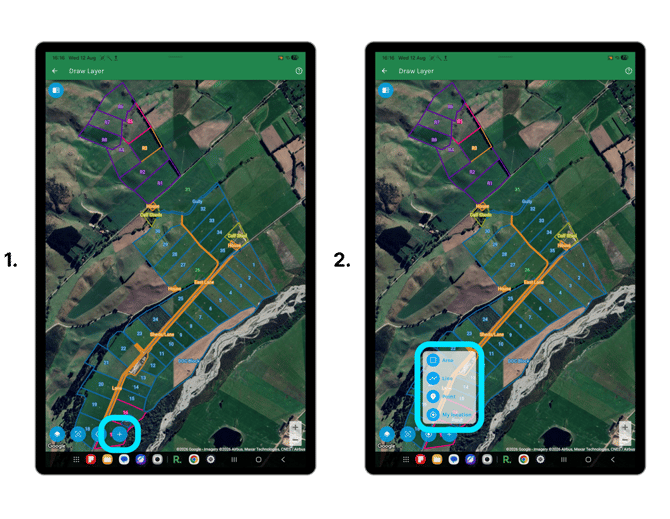
1. Select the blue plus icon to see the list of map layer tools available.
2. Select Area from the list.
### Drawing Your Area
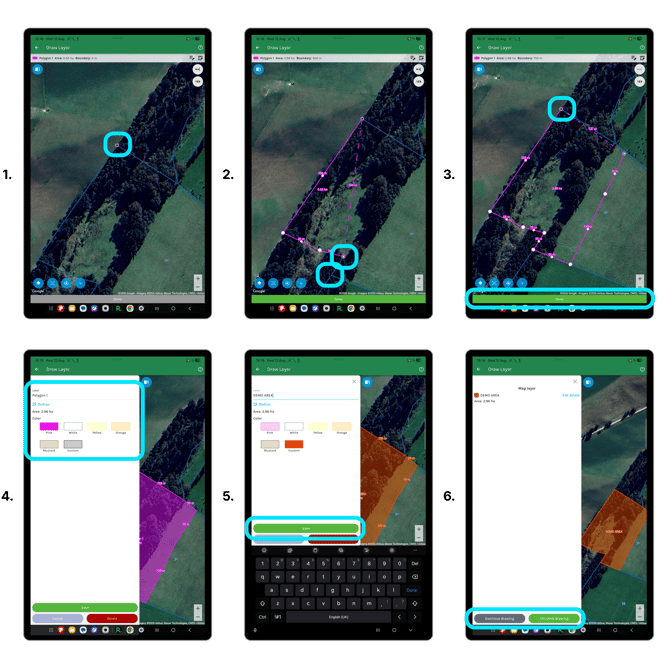
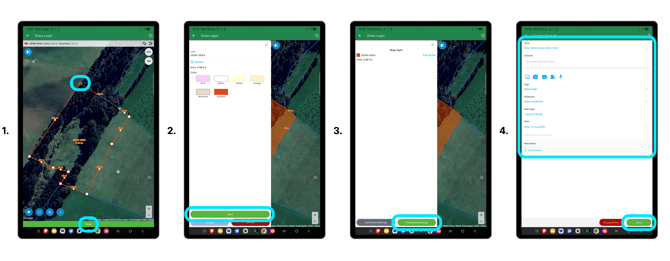
1. Zoom into the map for more precision, then tap or click to set your starting point.
2. Continue tapping or clicking around the map to outline your shape. This can be as simple as a three point triangle, or as complex as your paddock requires.
3. When you are ready to close your shape, select your first point (the one with the black centre circle), or select Done.
4. The sidebar opens automatically. From here you can -
1. Add a label
2. Choose a colour for your area.
5. Select Save.
6. Select Continue drawing to add more to your map layer, or Finished drawing to return to your record or task.
**NOTE:** When choosing a colour, click custom to choose from a wider variety.
### The Info Bar
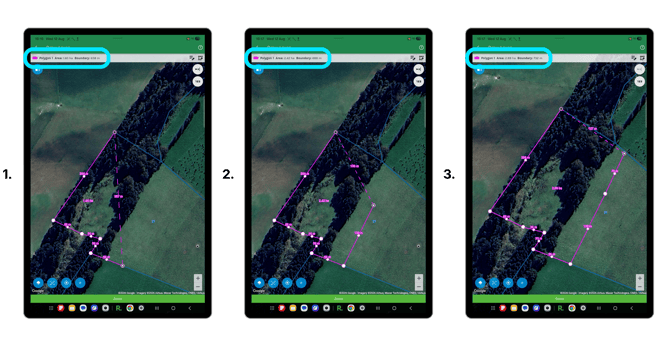
- As you place your first few points, the bar at the top updates to show the live area size and boundary length as you draw.
- This lets you keep an eye on your measurements at every stage.
### Moving a Point
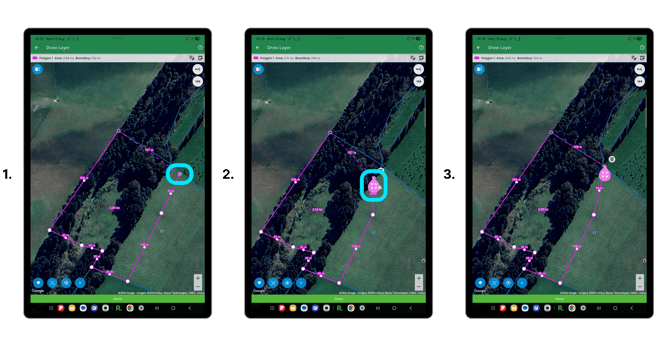
- At any stage while drawing, tap or click on any point and drag it to move it.
- This works the same way on both mobile and desktop.
### Removing a Point
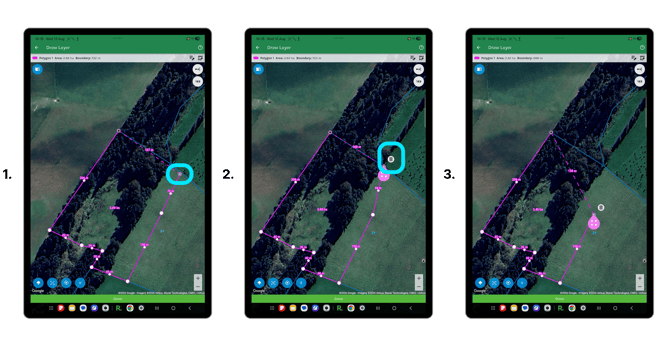
- If you want to remove a point altogether:
1. On mobile, select the point, then select the bin icon that appears.
**OR**
2. On desktop, either double-click the point, or select it and then select the bin icon.
### Snapping Tools
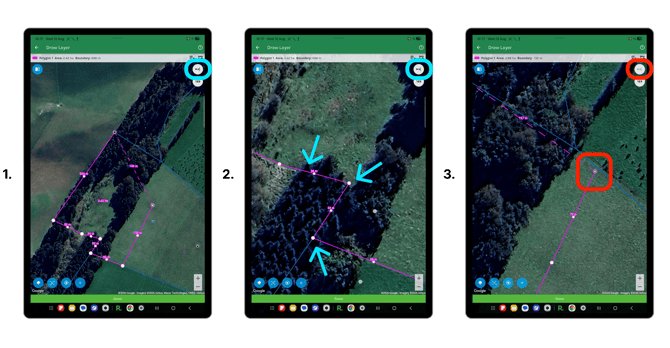
- The snapping tools icon in the top right corner turns snapping on or off.
**NOTE:** Snapping tools are turned on by default.
- With snapping on, when you tap close to an existing paddock, area, line or point, your points automatically sit along it, keeping everything tidy and accurate.
- Snapping also applies when moving points - drag a point close to an existing boundary and it snaps neatly into place.
- To draw freely without snapping, select the icon to turn it off. Your points then sit exactly where you place them.
- **Pro Tip:** If you're working on your desktop and want more control while drawing, press and hold Control to temporarily disable the snapping tools.
- This gives you free movement across the map without snapping to nearby lines or points.
### Showing or Hiding Measurements
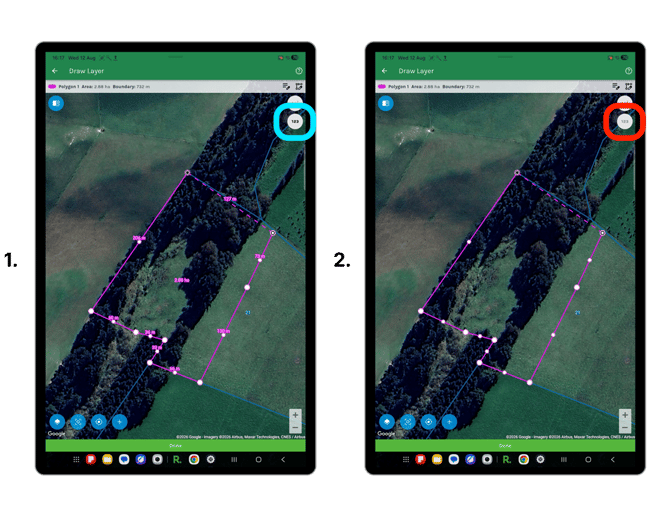
- The measurements icon below the snapping icon shows or hides the measurements of your area - area size and individual boundary lengths between each point.
**NOTE:** Measurements are shown by default.
- Select it to hide them for a cleaner view while drawing, then select it again to bring them back.
### Editing an Existing Area
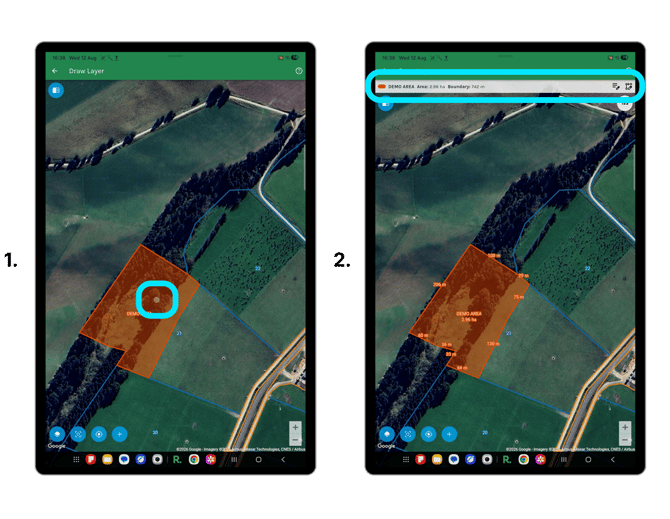
- To edit an area you have already drawn, select it on the map.
- The bar reappears at the top of the screen showing the area name, size and boundary length, along with the editing tools.
### Editing the Name or Colour
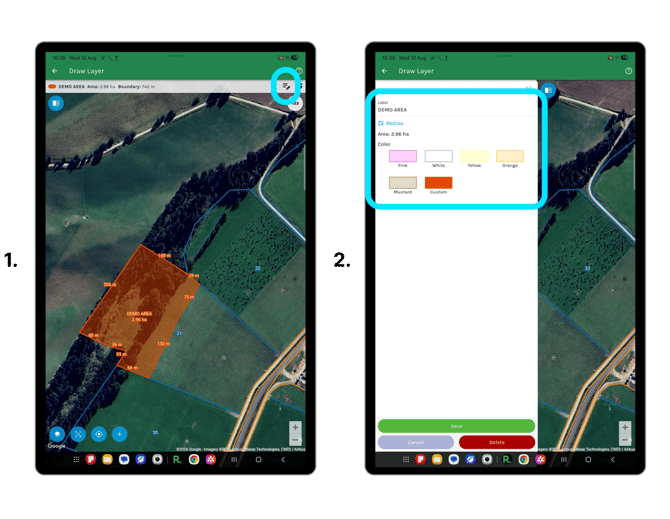
1. Select the Edit Details icon in the top right.
2. Update the label, choose a different colour, or select Custom for more options.
3. Select Save to confirm your changes.
### Editing the Shape
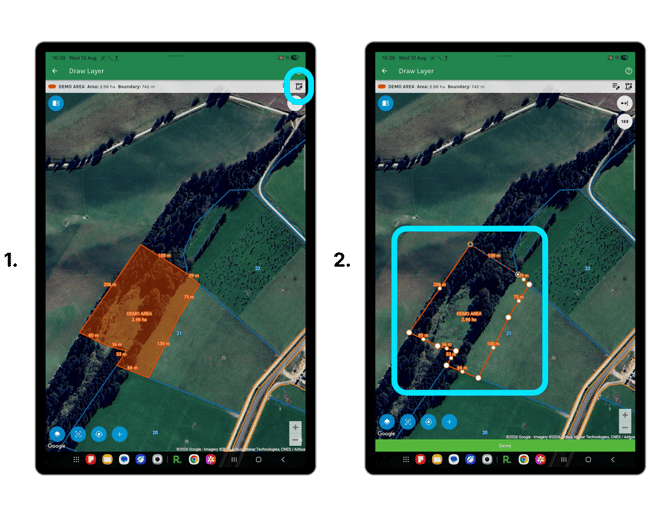
- Select the Re-draw icon in the top right.
- Use the same tools you have just learned - moving points, adding or removing points, and snapping - to make any adjustments needed.
### Finishing Your Map Layer
1. When you are ready to close your shape, select your first point (the one with the black centre circle), or select Done.
2. The sidebar will open again allowing you to make edits to the label and/or colour of your area.
3. Select Save.
4. Select Continue drawing to add more to your map layer, or Finished drawing to return to your record or task.
5. Continue creating your record or task by adding any other information needed, then select Save.
### Extra Info
- A perforated line always shows between your last point and your first point while drawing, so you can always see exactly where you are up to and how your shape will close.
- The dot with the black internal circle is your first point
- The dot with the white internal circle is your most recent placed point
- You can continue to add more areas, lines and points to your map layer by selecting Continue drawing.
- Your map layer saves with the record or task, so it appears whenever you view, print or share this record or task.
- The Area tool is one of four mapping tools. Line, point and my location work in a similar way and are covered in their own articles - **Coming Soon!**
### Related Articles
1. [Create a Record](https://support.resolutionapp.co.nz/records/create-a-record?hsLang=en-nz)
2. [Create a Task](https://support.resolutionapp.co.nz/tasks/create-a-task?hsLang=en-nz)
3. [Edit a Record](https://support.resolutionapp.co.nz/records/edit-a-record?hsLang=en-nz)
4. [Edit a Task](https://support.resolutionapp.co.nz/tasks/edit-a-task?hsLang=en-nz)
- [Getting started](https://support.resolutionapp.co.nz/getting-started?hsLang=en-nz)
- [Base Map](https://support.resolutionapp.co.nz/base-map?hsLang=en-nz#main-content)
- [Farm Base Map Editor](https://support.resolutionapp.co.nz/base-map?hsLang=en-nz#farm-base-map-editor)
- [Export Map](https://support.resolutionapp.co.nz/base-map?hsLang=en-nz#export-map)
- [Settings](https://support.resolutionapp.co.nz/settings?hsLang=en-nz#main-content)
- [User Settings](https://support.resolutionapp.co.nz/settings?hsLang=en-nz#user-settings)
- [Notifications](https://support.resolutionapp.co.nz/settings?hsLang=en-nz#notifications)
- [Account Settings](https://support.resolutionapp.co.nz/settings?hsLang=en-nz#account-settings)
- [Farm Settings](https://support.resolutionapp.co.nz/settings?hsLang=en-nz#farm-settings)
- [Tags](https://support.resolutionapp.co.nz/tags?hsLang=en-nz)
- [Records](https://support.resolutionapp.co.nz/records?hsLang=en-nz)
- [Tasks](https://support.resolutionapp.co.nz/tasks?hsLang=en-nz)
- [Map Layers](https://support.resolutionapp.co.nz/map-layers?hsLang=en-nz)
- [Timesheets](https://support.resolutionapp.co.nz/timesheets?hsLang=en-nz)
- [Chat](https://support.resolutionapp.co.nz/chat?hsLang=en-nz)
- [Tips & Tricks](https://support.resolutionapp.co.nz/tips-tricks?hsLang=en-nz)
- [Contact Support](https://www.resolutionapp.co.nz/support)
[](http://resolutionapp.co.nz)
Copyright 2026 - Top Rail Limited | All rights reserved
×