
The Line tool is just one of the mapping tools available. The remaining tools will each be discussed in another video.
Available on Mobile and Desktop
-
You can use map layers when creating both records and tasks.
-
Everything in this article works the same way on both mobile and desktop.
Creating a Layer
-
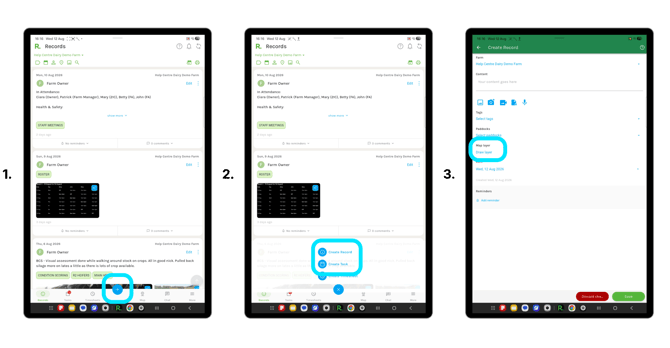
Select the blue plus icon, then select Create Record or Create Task.
-
Under Map layer, select Draw layer.
Choosing the Line Tool
-
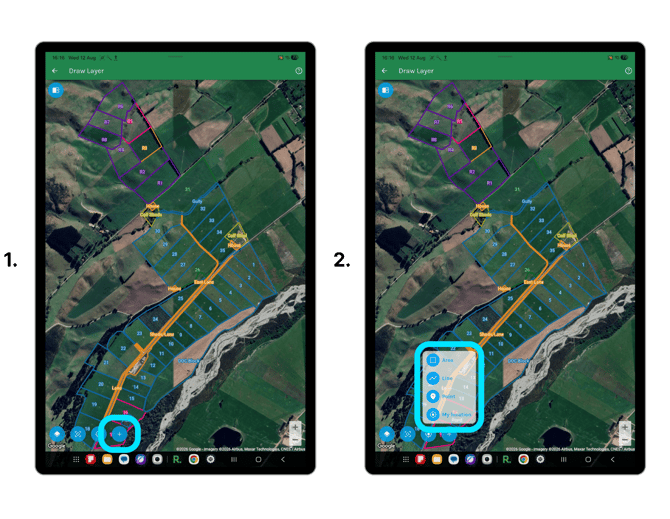
Select the blue plus icon to see the list of map layer tools available.
-
Select Line from the list.
Drawing Your Line
-
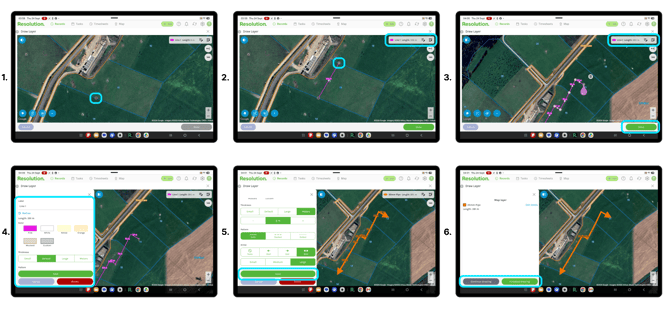
Zoom into the map for more precision, then tap or click to set your starting point.
-
Continue tapping or clicking around the map to draw your line. This can be as simple as a two point break fence, or as complex as a multi point waterline.
-
When you are ready to finish drawing, select Done.
-
The sidebar opens automatically so you can label, colour and select the style of your line. Each of these options is covered in detail in the sections below.
-
Select Save.
-
Click Continue Drawing to add more to your map layer, or Finished Drawing to return to your record or task.
The Line Bar
-
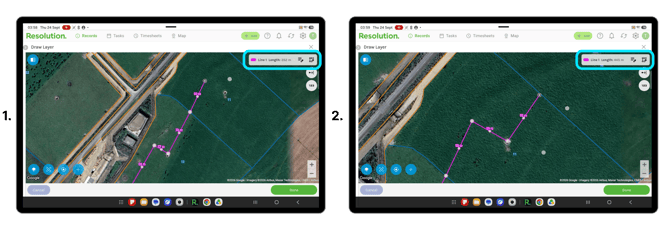
As you place your first few points on the map, the bar along the top (top right on tablet and desktop) shows the line label, colour and total live length.
-
The length updates in real time as you click around the map, so you can keep an eye on your measurements at every stage.
Snapping Tools
-
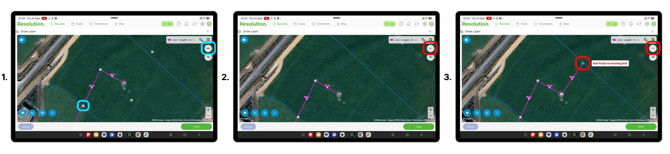
The snapping tools icon in the top right corner turns snapping on or off. It is on by default.
-
With snapping on, when you draw close to an existing paddock, area, line or points, your points automatically sit along it, keeping everything tidy and accurate.
-
Snapping also applies when moving points. Drag a point close to an existing boundary and it snaps neatly into place.
-
To draw freely without snapping, select the icon to turn it off. Your points then sit exactly where you place them.
Showing or Hiding Measurements
-
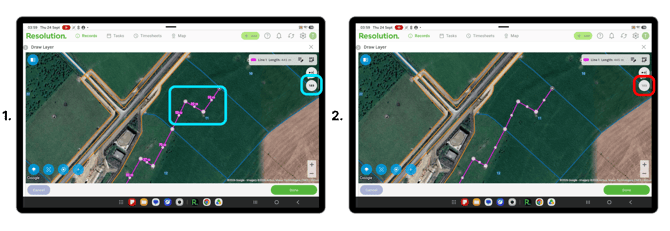
The measurements icon below the snapping icon shows or hides the length of each section of your line. Measurements are shown by default.
-
Select it to hide them for a cleaner view while drawing, then select it again to bring them back.
Moving a Point
-
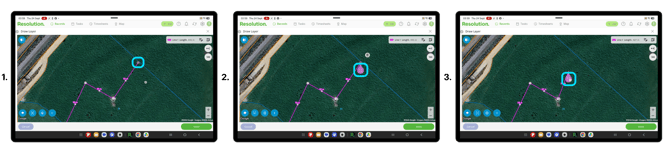
At any stage while drawing, select any point and drag it to move it, then release to set it in its new position.
-
This works the same way on both mobile and desktop.
Removing a Point
-
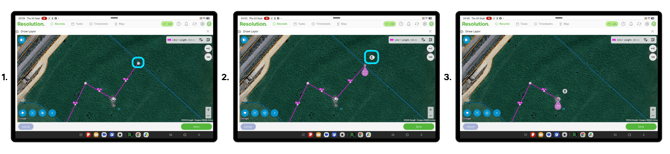
On mobile, select the point then select the bin icon that appears.
-
On desktop, double-click the point, or select it and then select the bin icon.
Adding a Label and Colour
-
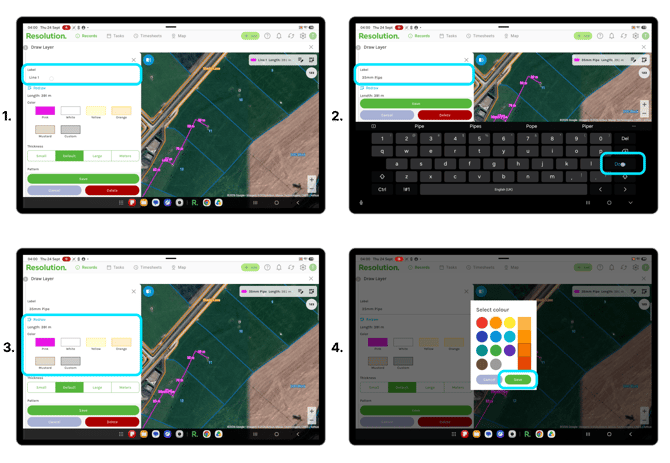
Once you select Done, the sidebar opens automatically.
-
Add a label to name your line.
-
Choose a colour, or select Custom to find more colours to choose from, then select Save.
Pro Tip - When drawing water lines, it may be helpful to name the line that size of the water pipe (if you know it).
Choosing Line Thickness
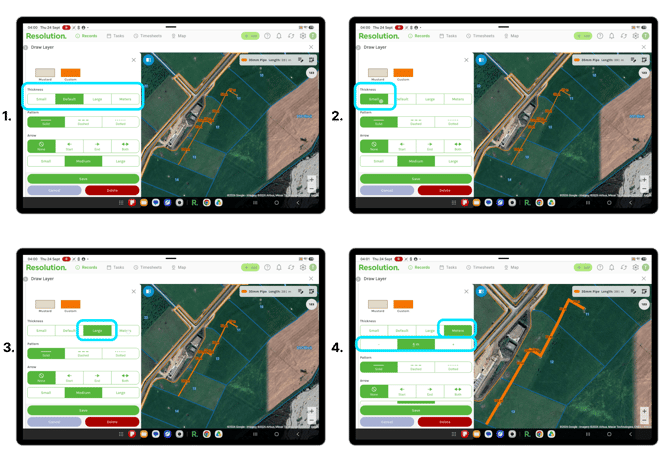
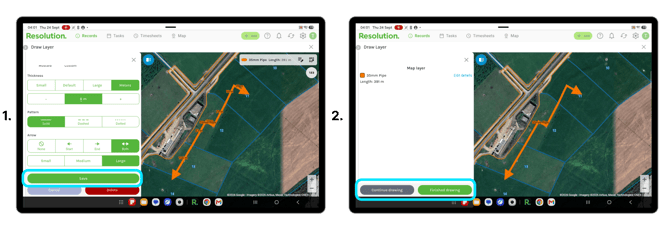
- Thickness is set to Default. Select from the options: Small or Large, or select Meters for more control.
- With Meters selected, use the + and – buttons to set an exact thickness anywhere from 0.1m to 20m. The line will update on the map so you can see the change as you click on the different options.
Pro Tip: The Meters option is handy when you want a line to match the real width of what it represents, such as a track or spreading run.
Choosing a Line Pattern
-
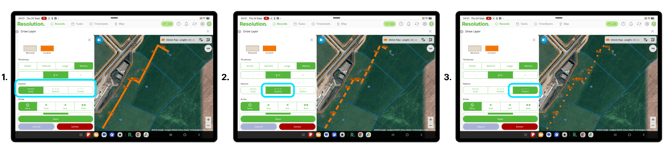
Choose the pattern for your line — Solid, Dashed or Dotted.
Adding Arrows
-
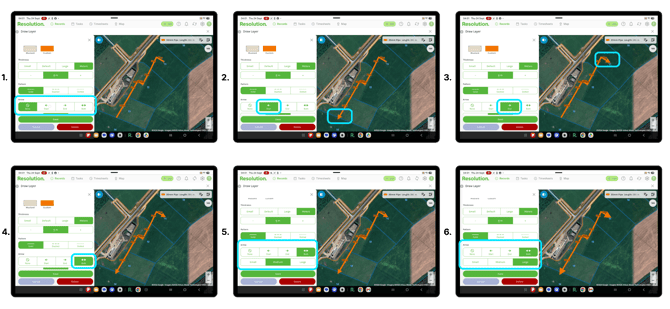
By default your line has no arrow. You can add an arrow at the Start, the End or Both ends.
-
Choose the size of your arrows — Small, Medium or Large.
Pro Tip: Arrows are really useful for showing direction at a glance - like directional grazing for Winter Grazing Plans, power flow or which gate to move stock through.
Saving Your Line
-
When you are happy with your line, select Save.
-
Select Continue drawing to add more to your map layer, or Finished drawing to return to your record or task.
Editing an Existing Line
-
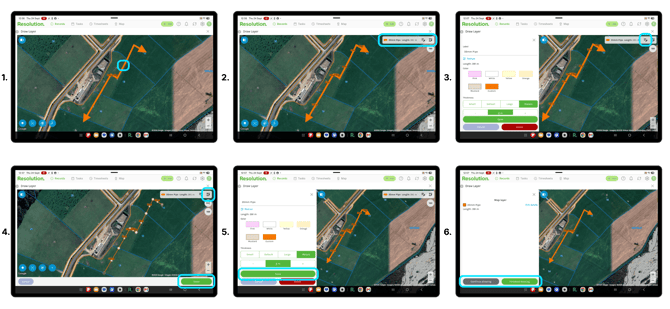
To edit a line you have already drawn, select it on the map.
-
The bar reappears at the top of the screen showing the line name and length, along with two editing icons.
-
To edit the name, colour, thickness, pattern or arrows, select the details icon on the left and make any changes needed.
-
To redraw or adjust the line itself, select the edit shape icon on the right. Use the same tools you have just learned - moving, adding and removing points, and snapping - to make any adjustments.
-
When you are happy with your changes, select Done to complete the line, then Save to confirm.
-
Select Continue Drawing to add more to your map layer, or Finished Drawing to return to your record or task.
Extra Info
-
Your line’s colour, thickness, pattern and arrows aren’t locked in - you can change them any time by editing the line.
-
You can add multiple areas, lines and points to your map layer by selecting Continue Drawing and repeating the above steps.
-
Your map layer saves with the record or task, so it appears whenever you view, print or share it.